So, you’re thinking about creating your own PowerPoint template, huh? Maybe you’re over those tired, generic designs, or perhaps you’re a creative genius just waiting to shine. Whatever the case, you’ve landed in the perfect spot!
In this step-by-step guide, I’ll show you how to design a custom PowerPoint template that’s uniquely yours. By the time we’re done, you’ll have a professional, polished template that’ll make your presentations pop and leave your audience wowed.
But first, let’s cover some basics, shall we?
What are PowerPoint Templates?
PowerPoint templates are pre-designed slide layouts that help you create stunning presentations in no time. They combine colors, fonts, and slide designs into a cohesive format.
Templates can be tailored for specific purposes, like: Explaining concepts in a classroom setting, Presenting a business plan,Showcasing sales pitches, or Explaining concepts in a classroom setting.
Why Use PowerPoint Templates?
Templates aren’t just about aesthetics—they’re a productivity powerhouse! Here are three major benefits:
- Save Time: With a pre-made template, you only need to focus on your content. No more fiddling with design details.
- Look Creative and Professional: Even if design isn’t your strong suit, templates make you look like a pro.
- Enhance Readability and Impact: Well-designed templates improve how your audience absorbs information and ensures they remember your key points.
Pro Tip: Need something ready-to-go? We’ve got a treasure trove of Free PowerPoint Templates to Download that’ll save you hours. But if you’re set on making your own, we’ve got you covered!
Now, let’s dive in and learn how to create your very own PowerPoint template, step by step. No fluff—just actionable steps.
Here’s the Template We’ll Create Together

Step 1: Download the Required Image
Before we get started, you’ll need just one image: an illustration of a mobile phone. To make things easy, I’ve provided it for free—just click the button below to download it.
Now that you’ve got the image, let’s dive into the exciting part: customizing your PowerPoint template!
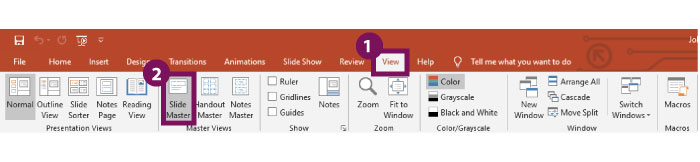
Step 2: Open the “Slide Master” in PowerPoint
The Slide Master is where the magic happens. Think of it as your creative control center. Here, you can customize elements that will appear on every slide of your template, like: Backgrounds, Titles, Images, Text Styles, etc.
To access the Slide Master, follow these steps:
- Open PowerPoint.
- Go to the View tab in the ribbon.
- Click on Slide Master.
Now, you’re inside the editor where you can build your unique template from scratch or modify existing layouts.
Why Use the Slide Master?
Customizing your slides here saves you time and ensures consistency. Any changes you make—like adding a background image or setting specific fonts—will automatically apply across all slides in your presentation. This way, you don’t have to repeat the same edits over and over.
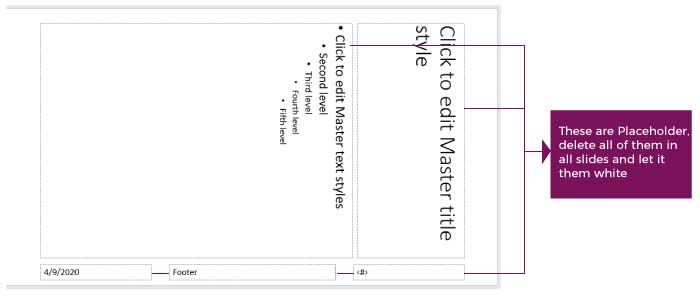
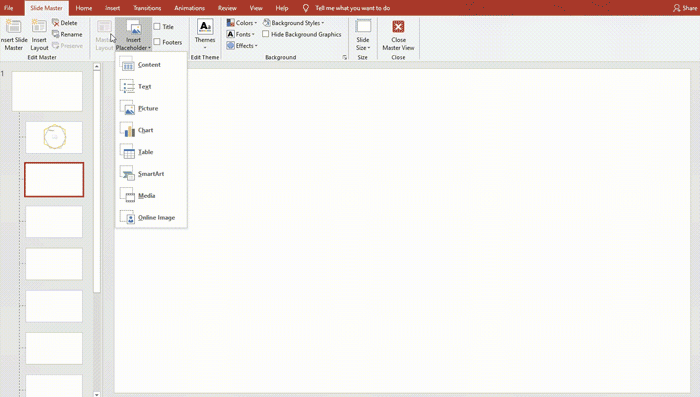
Step 3: Remove Default Placeholders
Now that we’re in the Slide Master view, it’s time to clear the slate.
- Delete the default placeholders (those pre-set text boxes and image frames).
- Once removed, you’ll have a clean, white canvas to create your own custom placeholders later.
Pro Tip: Don’t worry about perfection here—this is just the foundation for your personalized design!
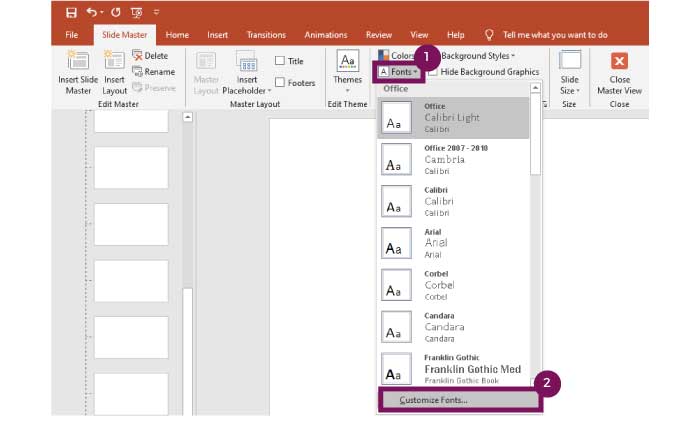
Step 4: Set the Fonts for Your PowerPoint Template
Fonts are a key part of your template’s personality. In this step, we’ll choose fonts that give your slides a polished and professional vibe.
Here’s What We’re Using:
- Body Font: Calibri (clean and modern, also a system font).
- Title Font: Arial Black (a bold, system font).
How to Set the Fonts:
- In Slide Master, go to the Fonts option in the toolbar.
- Click on Customize Fonts.
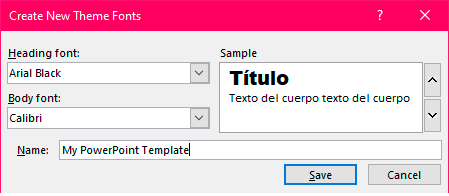
- In the Heading Font dropdown, select Arial Black.
- In the Body Font dropdown, select Calibri.
- Give your font scheme a name. We’ll call it “My PowerPoint Template”.
By setting up these fonts, you’re ensuring your presentation has a consistent and professional look across all slides. Plus, using system fonts like Arial Black and Calibri guarantees compatibility on any device!
Step 5: Creating a Cover Slide for Your PowerPoint Template
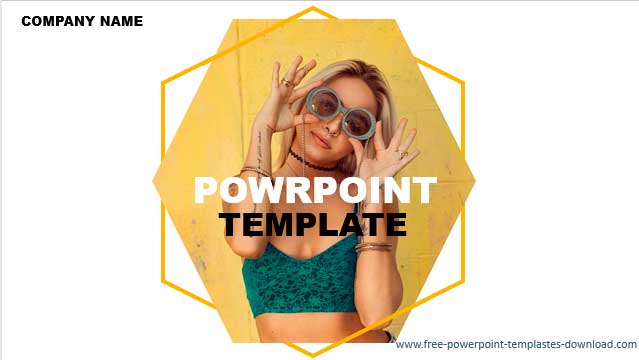
The cover slide sets the tone for your entire presentation. Let’s make it eye-catching with some creative placeholder shapes. Here’s how to do it:
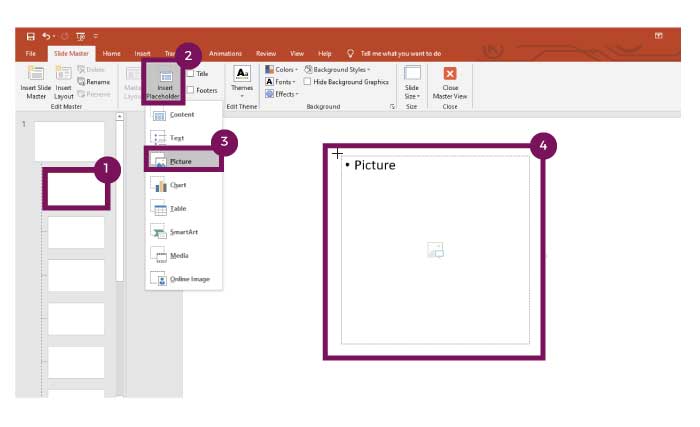
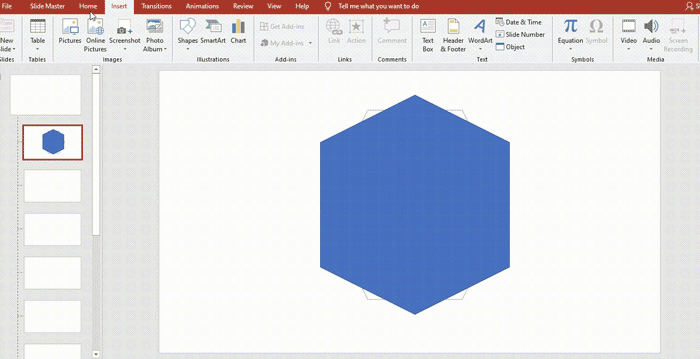
Add a Picture Placeholder
- In the Slide Master view, select the second slide (this will be your cover slide).
- Go to the Insert Placeholder option in the toolbar.
- Select Picture Placeholder.
- A cross-shaped cursor will appear. Use it to draw a placeholder in the center of the slide. (See the example image below for guidance.)
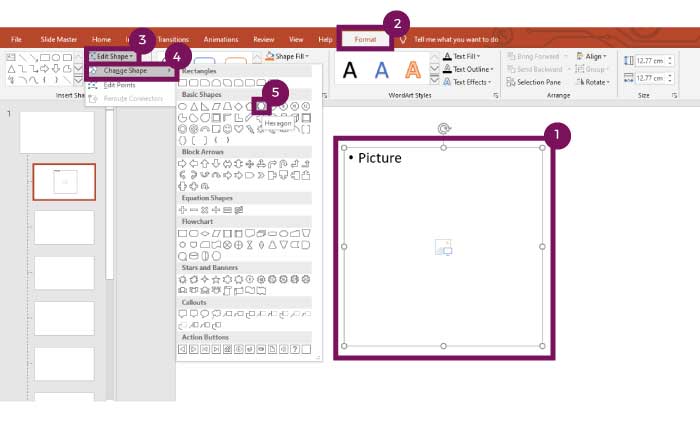
Turn the Placeholder Into a Hexagon
- Click on the placeholder you just created.
- Go to the Format tab in the toolbar.
- Select Edit Shape, then click on Change Shape.
- Choose the Hexagon shape from the dropdown menu.
Now, your placeholder is shaped like a hexagon—perfect for adding an image later!
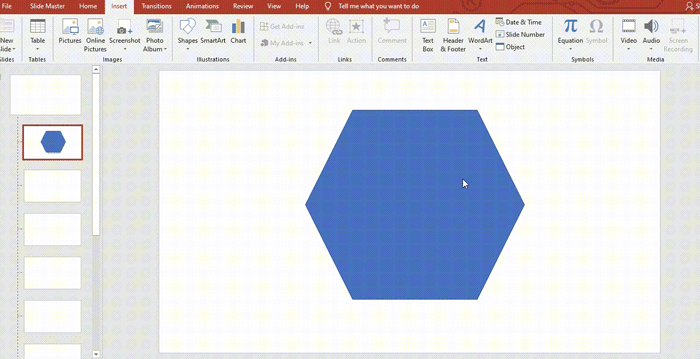
Add Another Hexagon for Design
Let’s enhance the cover slide by adding a decorative hexagon. Follow these steps:
- Turn it to the right or left until it aligns at a 45° angle.
- Go to the Insert tab and select Shapes.
- Choose the Hexagon shape.
- Draw a hexagon that matches the size of the placeholder and position it in the center of the slide.
- Rotate the hexagon 45°:
- Click the rotation arrow at the top of the shape.
- Turn it to the right or left until it aligns at a 45° angle.
Change the Hexagon’s Color
Time to give your hexagon some flair! Let’s customize its appearance to make your cover slide even more visually appealing:
- Click Shape Outline > Weight and select 6pt for a bold, clean look.
- Go to the Home tab in PowerPoint.
- Click on Shape Fill and select No Fill (this will make the center of the hexagon transparent).
- Next, go to Shape Outline and pick a color you love—we’ll use yellow as an example.
- Finally, adjust the thickness of the outline:
Yay! You’ve just created a stunning cover slide for your PowerPoint template! 🎉
Step 6: Creating the Slides for Your PowerPoint Template
Now that we’ve nailed the cover slide, let’s move on to the other slides. This part is simpler because you’ll just replicate the design process for different layouts.
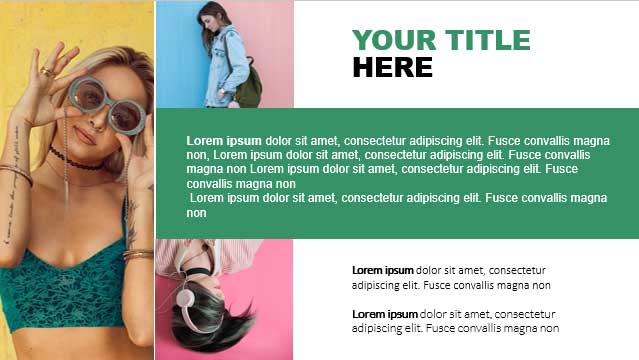
Step 6.1: Designing the First Slide
Here’s an example of the first slide you’ll create. This one will serve as a template for the rest of your slides.

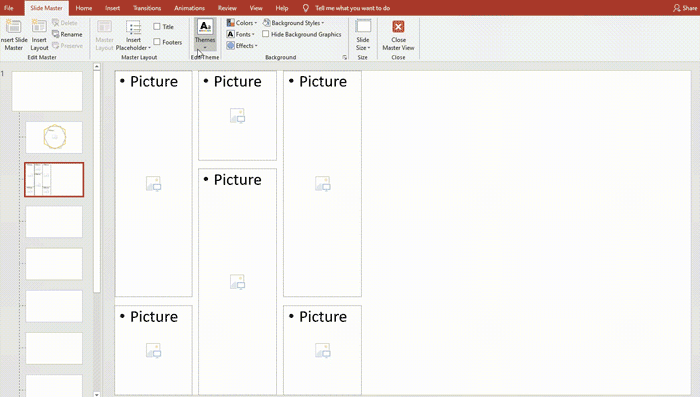
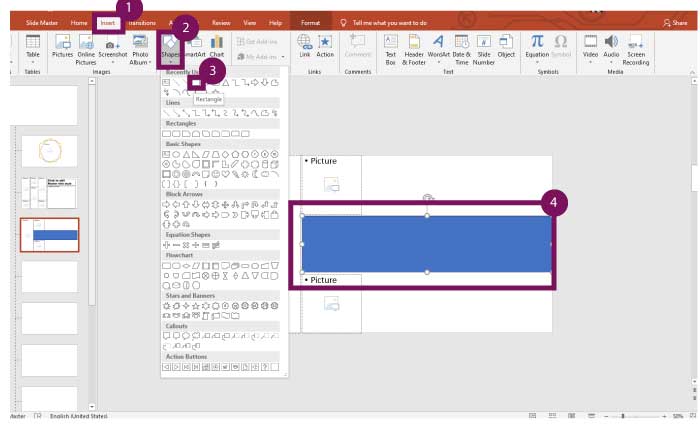
Now, let’s create the second slide—a visually appealing layout to showcase multiple images. Here’s how to do it:
- Go back to Slide Master and select the third slide in the layout.
- Insert six Picture Placeholders:
- Use Insert Placeholder > Picture to draw the first rectangle placeholder.
- Arrange it where you want the first image to go.
Pro Tip: Copy and Paste for Speed
Instead of inserting each placeholder manually, simply copy and paste the first one:
- Select the first placeholder.
- Press Ctrl + C to copy it, then Ctrl + V to paste.
- Repeat until you have six placeholders.
See? No magic, just good ol’ Ctrl + C and Ctrl + V. 😉
Adding a Title and Text to the Slide
Now that you’ve set up the placeholders, let’s add some text:
- Click on the Title Box and insert a title that complements the layout.
- Use Insert Placeholder > Text to create a text box. Position it carefully so it doesn’t overlap with the image placeholders.
And voilà! You’ve completed the design for your second slide. Keep this layout as a template for similar slides, and you’re well on your way to a complete PowerPoint template.
Step 6.2: Creating the Second Slide for Your PowerPoint Template
Now, let’s move on to creating the second slide. This layout is similar to the first, but with a slight twist in the design. Here’s what we’re going to add:
Three placeholders for pictures: One rectangular, and Two square placeholders for images.
One title box
Two text placeholders
One colored rectangle to add some flair and structure
How to Set It Up:
- Insert the Image Placeholders:
Use Insert Placeholder > Picture for the rectangular placeholder.
Add two square placeholders using the same method, positioning them neatly. - Add Title and Text:
Insert a Title Placeholder at the top.
Add two Text Placeholders below the title, making sure they don’t overlap with the image areas. - Add the Colored Rectangle:
Go to Insert > Shapes, and select a Rectangle.
Resize it to fit where you need and apply a color that complements your design.
While you’re placing the placeholders, I’ll walk you through the next steps to complete your template design. Keep going—you’re almost there!
Step 6.2.1: How to Add the Colored Rectangle
Now, let’s add the final touch to this slide with a colored rectangle. Follow these simple steps:
Insert the Rectangle:
- Go to Insert > Shapes and select the Rectangle shape.
- Draw the rectangle between the two image placeholders you’ve already created.
Change the Rectangle’s Color:
- With the rectangle selected, go to the Home tab.
- Click Shape Fill and choose the color you like. For this template, we’ll use a custom color to make it stand out.

Well done! You’ve just completed the second slide. Now, let’s move on to the third slide, and from there, you’ll be able to create the rest of your slides by following the same design pattern.
Adding Title and Text to the Slide
- Insert the Title and Text Placeholders:
- Add a Title Placeholder at the top.
- Below it, insert Text Placeholders for your content.
- Make the Text Over the Rectangle Stand Out:
- If you have text sitting on top of the colored rectangle, it might be hard to read. To fix that, select the text and go to Home.
- Change the font color to white (or any contrasting color) to ensure it’s easy to read against the background.
Step 6.3 Creating the Third Slide for Your PowerPoint Template
Remember when I mentioned at the beginning that you’d need to download one picture? Well, it’s time to put it to use!
If you haven’t downloaded the mobile phone illustration yet, don’t worry—I’ve left the download button right here for you:
Step 6.3.1. Add the Phone Pic
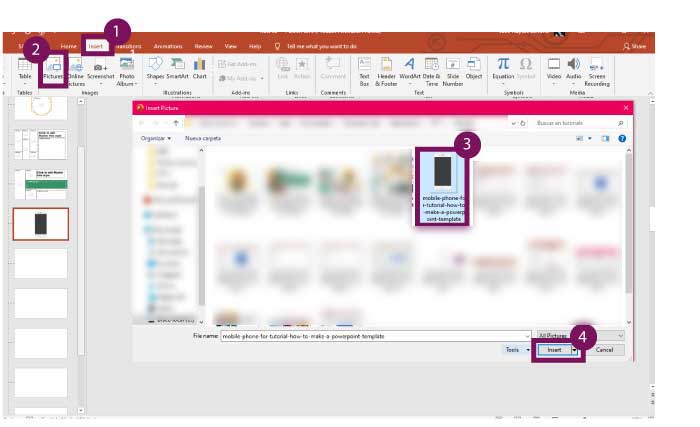
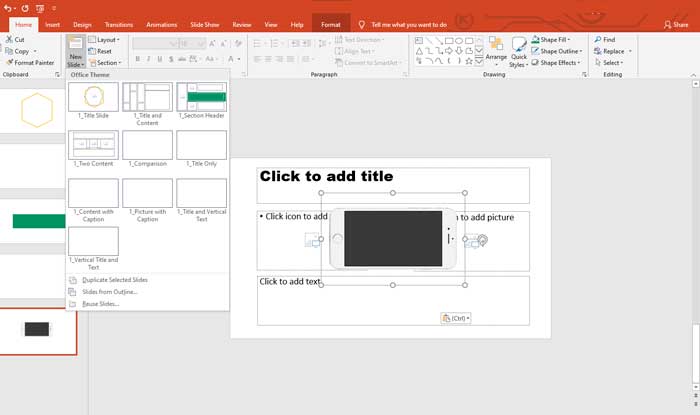
Now that you’ve downloaded the mobile phone picture, let’s add it to your third slide. Here’s how to do it:
- Stay in Slide Master (we’re still working within this view, so don’t exit yet).
- Go to the fourth slide in the Slide Master.
- Select Insert > Picture, and locate the image you just downloaded.
- Click on the image and hit Insert.
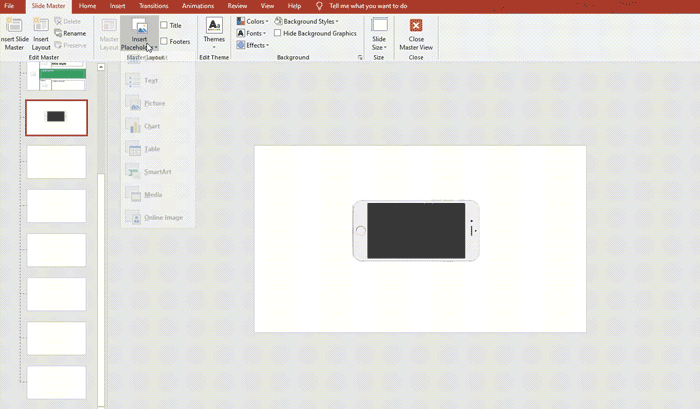
Position and Resize the Phone Picture
Once the image is inserted:
- Move the phone to the center of the slide.
- Rotate the phone 45° to the right.
- Resize it by clicking and dragging the corners of the image to make it smaller.

Add Placeholders for the Pictures
Add three picture placeholders as we did before.
- Two behind the phone.
- One in the phone’s screen.
Why Move the Phone Picture?
Once you’ve positioned the phone and added the placeholders, you’re almost done! But now, here’s an important step:
- Press Ctrl + X to cut the phone image.
- Why do this? If you leave the phone in Slide Master, it won’t be editable later when you want to customize it for specific slides. Don’t worry—you’ll paste it back shortly!
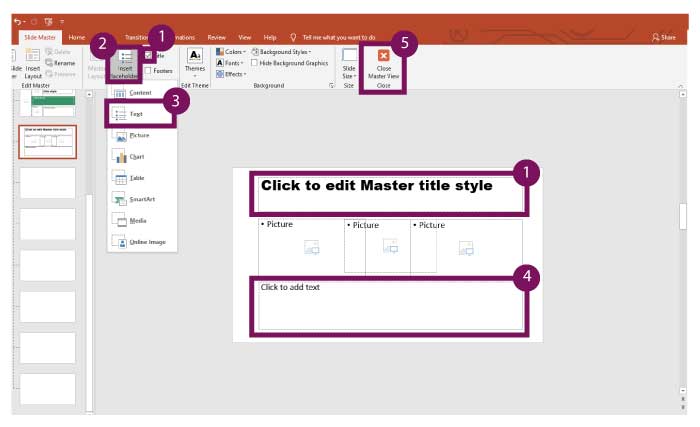
Step 6.3.2. Add Title and Placeholder Text
We’re almost there! Now it’s time to add the title and text placeholders to your slide:
- Insert the Title: Add the Title Placeholder at the top of your slide.
- Add Text Placeholders: Insert Text Placeholders where necessary for your content.
Close the Master View:
Once you’ve added the title and text placeholders, it’s time to leave Slide Master: Click on Close Master View.
Add Your Slides to the PowerPoint Deck
Now that you’ve created your template, let’s use it to build your actual slides:
- You’ll be taken back to the PowerPoint Home Page.
- Start adding the slides you created by going to New Slide.
- When you get to the last slide you made, press Ctrl + V to paste the phone image back into the slide.
Reorganize the Images
Once your image is pasted, you’ll need to arrange the pictures:
- Send the images on the sides to the back (this ensures the phone in the center stays in front).
- Bring the phone image to the front so it remains the focal point.
Step 7: Final Touches
Now that you’ve got the third slide ready, it’s time to complete the rest of the slides:
- Create the remaining slides by following the same design process we’ve used for the first few.
- No need to worry about detailed instructions for every slide—just replicate what we’ve already covered.
You’re Done! Congratulations! You now have a fully customized PowerPoint template with a cohesive, professional design. 🎉
Compare your template
To see how it compares to the one I’ve designed, you can download the template using the button below:
Once you download it, you’ll see a simple PowerPoint template—but remember, this is just a base. You still need to add your content to make it truly shine. It’s time to let your creativity soar! ✨
We’ve also included some image suggestions in the template, all sourced from Pixabay to help inspire your own design.
Thank you!
Thank you for reading this tutorial! I hope you found it helpful and enjoyable. Remember, we have lots of Free PowerPoint Templates available for download, so you can save time and create amazing presentations effortlessly.
Share Your Work!
We’d love to see your results! If you’re happy with your new PowerPoint template, feel free to send it to us. And don’t forget to share this guide with others—it would mean a lot to us. 😊
If my PowerPoint Templates helped you, consider supporting with a donation! Every bit helps me keep creating free content. 😊
Follow us on social media to recieve updates about new templates. And so, we can keep doing these PowerPoint Templates for you for free
Facebook | Instagram | Youtube | Twitter | TikTok | Pinterest
You Also Might Like: Abstract PPT | Business PPT | Creative PPT | Powerpoint Templates Design Ideas | Education PPT | Minimalist PPT | Professional PPT | Simple PTT | Professions PPT | Marketing PPT | Medical PPT | Infographics PPT | PPT y Temas Gratis en Español


GIPHY App Key not set. Please check settings